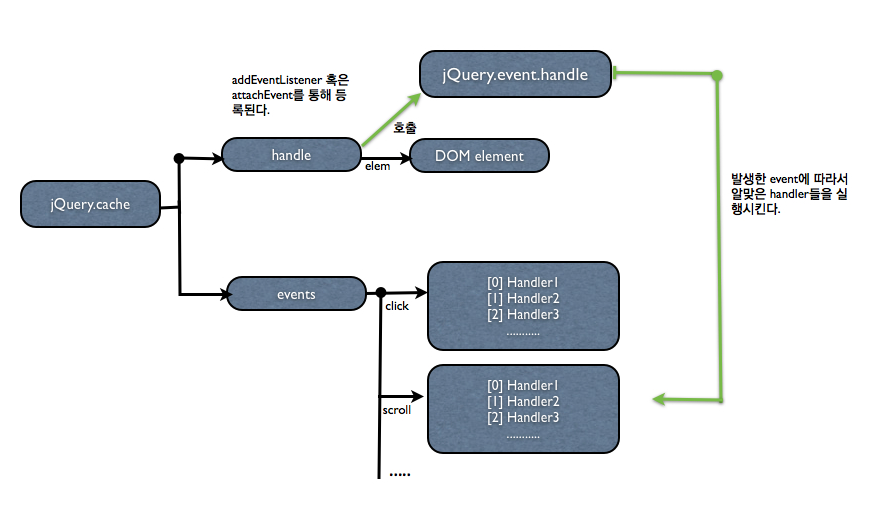
jQuery에서 이벤트 핸들러 등록 및 호출 과정
이 문서는 jquery-1.2.2.js 를 바탕으로 작성되었다.
jquery에서는 click, scroll, mousedown, mouseup등의 각종 이벤트들에 대해서 사용자가 정의한 이벤트 핸들러를 등록하기가 상당히 용이하다.
본 문서에서는 jQuery 내부에서 이벤트 핸들러 등록 과정과 호출 과정이 어떻게 이루어지는지 알아보도록 하자.
알아야할 메소드
사용자는 click 이벤트에 대한 핸들러를 다음과 같이 등록할 수 있다.
$("<div>").click(function() {
    alert("Hello world!");
});
jquery.fn.click 함수를 이용하여 인자로 자신의 함수를 넘기면, 해당 div 를 클릭하게 되면 이 함수가 실행된다.
먼저 jquery.fn.click이 어떻게 정의되어 있는지 보자.
jquery-1.2.2.js의 2344 라인에 다음과 같은 코드가 있다.
jQuery.each( ("blur,focus,load,resize,scroll,unload,click,dblclick," +
"mousedown,mouseup,mousemove,mouseover,mouseout,change,select," +
"submit,keydown,keypress,keyup,error").split(","), function(i, name){

// Handle event binding
jQuery.fn[name] = function(fn){
    return fn ? this.bind(name, fn) : this.trigger(name);
    };
});
each함수의 첫번째 인자는 split 함수를 통해 다음과 같은 배열이 된다.
[“blur”, “focus”, “load”, …. , “error”]
두번째 인자로 넘기는 함수 function(i,name) {} 는 each함수를 통해 배열의 각 요소들에 대해 반복적으로 실행되며, 이 때 각 요소들을 이름으로 하는 함수가 정의된다. ( 두번째 인자인 name을 통해 array의 각 요소인 “blur”, “focus” 등이 넘겨진다. each함수를 잘 모른다면 꼭 each 함수를 공부해서 이 글을 보기 바란다. )
이를 테면 다음과 같다.
jQuery.fn.blur = function(fn) { return fn ? this.bind("blur", fn) : this.trigger("blur"); };

jQuery.fn.focus = function(fn) { return fn ? this.bind("focus", fn) : this.trigger("focus"); };

.....

jQuery.fn.click = function(fn) { return fn ? this.bind("click", fn) : this.trigger("click"); };
여기서 jQuery.fn.click 이 선언되는 것이다.
그렇다면 사용자가 자신의 함수를 인자로 넣어 이 함수를 호출한 경우를 살펴보자.
fn이 넘겨졌으므로 this.bind를 실행하고 리턴되는 객체를 리턴할 것이다.
jQuery.fn.bind 는 다음과 같다.
bind: function( type, data, fn ) {
    return type == "unload" ? this.one(type, data, fn) : this.each(function(){
        jQuery.event.add( this, type, fn || data, fn && data );
    });
},
type은 “click”이고, data는 사용자 정의 함수이다.
따라서, this.each( function() { jQuery.event.add(this, “click”, fn(사용자 정의함수) ); } ); 가 실행된다.
( 주의할 점은 this.each의 this는 jQuery객체(여기서는 $(‘div’))이고, function안의 this는 jQuery객체의 각 DOM element가 된다.
이는 jQuery를 이해하는 데 있어서 중요한 부분이고 이를 이해하기 위해서는 jQuery객체의 구조와 each함수를 정확하게 이해하고 있어야 한다. )
따라서 this.each함수를 통해 jQuery 객체의 각 DOM element들을 this로 하는 jQuery.event.add 를 실행하게 된다.
이제 jQuery.event.add 함수를 통해 실제 window의 이벤트와 바인딩 시키는 것만 확인하면 된다.
참고로 이 코드는 주석에도 나와있듯이 Dean Edwards의 addEvent함수를 참고하였다. 이 함수를 이해하고 다음 코드를 본다면 보다 쉽게 이해할 수 있을 것이다. 이 블로그의 다음 포스트를 참고하기 바란다.
이 함수는 100라인에 가까우므로 중요한 부분을 발췌하면 다음과 같다.
add: function(elem, types, handler, data) {
...............
// Init the element's event structure
var events = jQuery.data(elem, "events") || jQuery.data(elem, "events", {}),
handle = jQuery.data(elem, "handle") || jQuery.data(elem, "handle", function(){
    // returned undefined or false
    var val;

    // Handle the second event of a trigger and when
    // an event is called after a page has unloaded
    if ( typeof jQuery == "undefined" || jQuery.event.triggered )
        return val;

    val = jQuery.event.handle.apply(arguments.callee.elem, arguments);

    return val;
});

// Add elem as a property of the handle function
// This is to prevent a memory leak with non-native
// event in IE.

handle.elem = elem;

// Handle multiple events seperated by a space
// jQuery(...).bind("mouseover mouseout", fn);
jQuery.each(types.split(/\s+/), function(index, type) {
    // Namespaced event handlers
    var parts = type.split(".");
    type = parts[0];
    handler.type = parts[1];

    // Get the current list of functions bound to this event
    var handlers = events[type];

    // Init the event handler queue
    if (!handlers) {
        handlers = events[type] = {};

        // Check for a special event handler
        // Only use addEventListener/attachEvent if the special
        // events handler returns false
        if ( !jQuery.event.special[type] || jQuery.event.special[type].setup.call(elem) === false ) {
        // Bind the global event handler to the element
            if (elem.addEventListener)
                elem.addEventListener(type, handle, false);
            else if (elem.attachEvent)
                elem.attachEvent("on" + type, handle);
        }
    }

    // Add the function to the element's handler list
    handlers[handler.guid] = handler;

    // Keep track of which events have been used, for global triggering
    jQuery.event.global[type] = true;
});

// Nullify elem to prevent memory leaks in IE
elem = null;
}
4~17 라인 :
var events = jQuery.data(elem, "events") || jQuery.data(elem, "events", {});

var handle = jQuery.data(elem, "handle") || jQuery.data(elem, "handle", function(){});
jQuery.data를 통해 events,handle 라는 프로퍼티를 만들어 각각 빈 객체 및 함수객체를 캐쉬에 넣는다.
jQuery.data 의 역할은 이 블로그의 다음 포스트를 참고하기 바란다.
여기서 handle은 data 메소드의 세번째 인자로 들어간 펑션객체를 가리키게 된다.
34 라인: var handlers = events[“click”];
handlers는 events의 “click” 프로퍼티를 가리키게 된다.
53 라인 : handlers[handler.guid] = handler;
사용자 정의함수는 handlers 즉 DOM 요소객체에 추가된 events 의 click 안에 고유한 ID를 통해 들어가게 된다.
44~48 라인: addEventListener 혹은 attachEvent를 통해 handle 이 등록된다. 따라서, 실제로 이벤트가 발생했을 때 제일 처음 호출되는 함수는 handle ( 5라인에서 정의된 anonymous 함수 ) 이 된다.
이 사용자 정의 함수는 val = jQuery.event.handle.apply(arguments.callee.elem, arguments); 를 통해 jQuery.event.handle 이 실행된다. 여기서 arguments.callee.elem은 DOM 요소를 나타낸다.
jQuery.event.handle 에는 jQuery.data(elem, “events”) 에서 해당 event의 타입에 맞는 사용자 정의함수를 하나씩 꺼내와서 실행시키게 된다.
jQuery.event.handle 함수에 대한 자세한 설명은 다음 포스트를 참고하도록 하자.
위에서 설명한 내용을 그림으로 그려보면 다음과 같다.

요약하면, Dean 의 addEvent와 마찬가지로, 캐쉬에 사용자 정의 함수가 들어가게 되고, 실제로는 이벤트가 발생하면서 jQuery.event.handle 함수가 호출되면서 캐쉬에 있는 사용자 정의 함수를 실행하게 되는 것이다.